Arduino IDE Signal Monitoring Accessibility Improvements
Neil Smith
Brett Wortzman
Future of Access Technology: CSEP 590A, Spring 2021
Table of Contents
- Overview Video
- Introduction
- Background
- Related Work
- Solutions
- Validation
- Learnings and Future Work
- References
Overview Video
Introduction
Arduino is a popular microcontroller development platform. This project explores techniques for improving the accessibility of digital signal analysis tasks in the Arduino Integrated Development Environment (IDE). We present three interaction modalities: easy capture of signal data to the clipboard; feature extraction from a stream of signal data, with features spoken by the system’s screen reader; and continuous sonification of a signal data stream.
These have all been implemented to the “proof of concept” stage and could be used as a basis for subsequent user research, improvements, and refinement for release as IDE enhancements. The ideas presented in this project could also be applied to other development environments, for example Visual Studio Code’s Arduino plugin, or standalone open source serial data tools.
Background
The Arduino ecosystem is one of the oldest and most popular hobbyist embedded development platforms, due to low cost of entry for both hardware and software, and because a wide range of systems and peripherals support it. A typical Arduino project consists of an Arduino processing board with simply-connected digital and analog peripherals, such as switches, potentiometers, and simple digital bus interface devices such as an accelerometer. The Arduino repeatedly samples sensor values and performs processing based on those values; for example, actuating a servo, making a sound, or generating an HTTP request sent to the Internet.
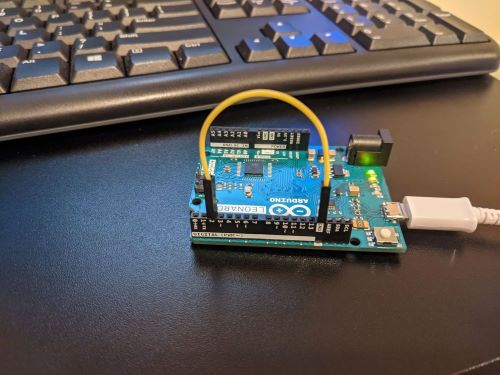
Arduino Leonardo wired with a simple on/off switch

Block diagram of an Arduino embedded system showing serial communication with a host laptop
Arduino development can be challenging for people with disabilities. First, hardware development and prototyping often presumes dexterity, mobility, and visual acuity due to the need for precise manipulation of small components when building circuits.
Second, the Arduino IDE is a Java Swing application, and has a minimal screen reader interface. While Java Swing does talk to Java’s accessibility framework, there are two problems: Windows requires an optional third-party module, the Java Access Bridge, to interface Java accessibility with native Windows OS accessibility. This needs to be installed specially and enabled by hand. The Arduino IDE developers added improvements for accessibility support in 2019 (release 1.8.10), focusing on fixing components which did not interact well with screen readers.
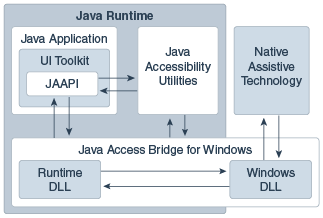
Block diagram of the Windows Java Access Bridge in a Windows system
(from https://docs.oracle.com/javase/9/access/java-access-bridge-architecture.htm)
Finally, the Arduino IDE’s support for digital and analog signal analysis is not very accessible. The main tool for analyzing signals is a visual graph of signal values over time. This is very useful for sighted developers, but totally unusable by a blind developer.
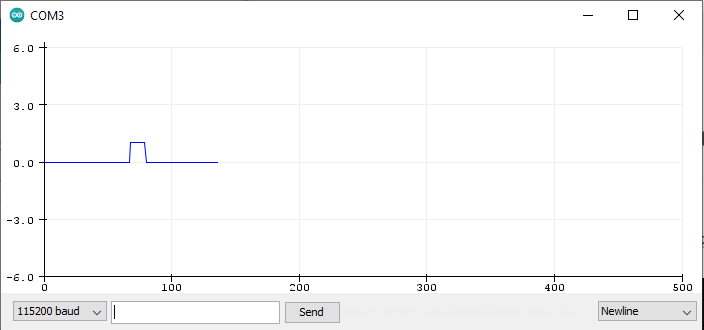
Arduino IDE’s Signal Plotter Tool
A second tool permits viewing serial data a text in a window, but this text is difficult to render in a screen reader because of the IDE’s minimal screen reader support.
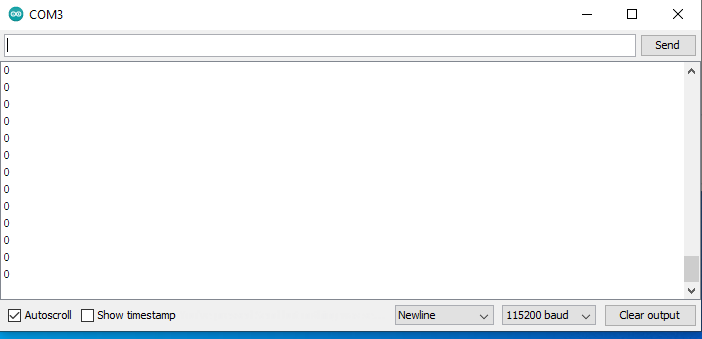
Arduino IDE’s Signal Monitor Tool
Related Work
The Blind Electronics blog (http://blindelectronics.com) includes an article on how to set up the Arduino IDE with the Windows JAWS and NVDA screen readers. Since the Arduino IDE is a Java Swing-based application, Windows requires that the Java Access Bridge also be installed and activated so that the Java runtime can communicate with the Windows accessibility libraries. This has to be set up by hand as it’s not part of the default Arduino installation.
The Blind Arduino Blog (http://blarbl.blogspot.com) has an article discussing techniques for making signal information available to blind users through sound. The article starts by discussing visual signal displays most commonly used in Arduino projects, and how these displays are not usable by blind users or developers. The author suggests non-visual outputs, such as sound or haptic feedback. While linking to a related article on haptic feedback, the rest of the article discusses how to use tone generation on the Arduino board itself to make digital and analog signals available to a BLV developer. The article is fairly thorough, including detailed code examples.
Finally, we found research (Qutieshat et al., 2019) describing the design and implementation of an Arduino-based pH sensor for the visually impaired. This project was for a chemistry instruction lab for a health sciences degree program in Jordan. The lab used pH paper, which assumes accurate assessment of color by the viewer, for measuring pH values. This meant that colorblind students had problems measuring pH. The researchers interfaced an off-the-shelf colorimetric sensor breakout board from Adafruit with an Arduino. They were able to translate pH paper colors to an audible signal – number of beeps per pH number. Color-blind users evaluating their system felt that the system “…provided them with a unique experience that is not possible in the traditional teaching approach, thereby boosting their self-esteem and making them feel equal to their peers”.
Solutions
While most of the existing solutions we reviewed used sound generation on board the Arduino itself, we decided to try and make the Arduino IDE’s signal monitoring tools more accessible. We felt this was a viable approach for this project since it does not require any special hardware. This means that it should be usable by any Arduino developer without having to modify their existing project Arduino sketch, aside from enabling basic Serial data output to the desktop system.
Signal data can be complex. Most Arduino use we’ve seen falls into one of the following use cases:
- Digital data (ones and zeros).
- Simple analog data varying slowly over time; for example changes in a potentiometer position.
- Complex analog data such as the output from a microphone or an accelerometer.
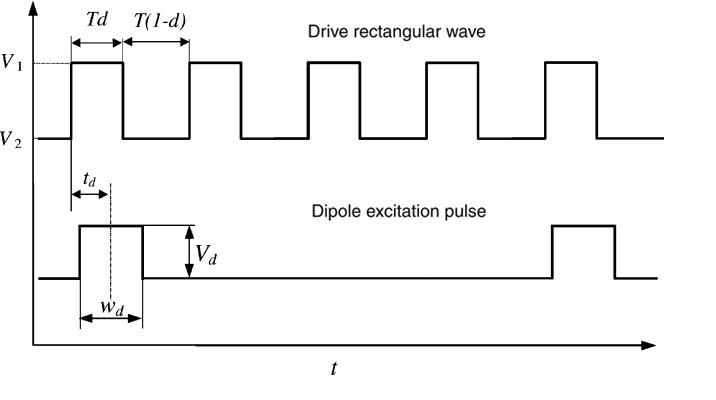
Digital data waveforms
(from https://commons.wikimedia.org/wiki/File:Digital_Ion_Trap_waveforms.jpg)
Our work focused on the first use case, debugging streams of digital data. While we acknowledge the second and especially the third use cases are significant, we felt we had no great solution for this case in the time available. However, we believe that we have several viable solutions for digital data debugging.
We implemented three different strategies:
- Capture and transfer signal data to the system clipboard, for rendering by the user’s tool of choice.
- Detect signal features in real time and read them through the system’s screen reader.
- Play a continuous tone, varying its pitch as the signal level changes.
We wanted to try a variety of strategies since we are not sure which would work best; indeed, the “best” strategy is likely context dependent – based on a user’s preferences and the kind of signal being analyzed. So, having a broad range of tools to choose from seems like a good idea.
This video demonstrates the features we implemented.
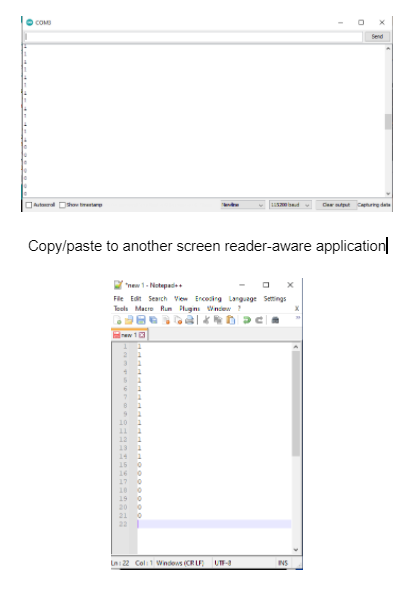
Capture to Clipboard
This technique provides a controlled way to capture and transfer received signal data to a user’s preferred editing environment. The workflow is:
- Open the Arduino IDE serial monitor.
- Press Ctrl-Space to start capturing serial data.
- Perform the desired physical input on the embedded system.
- Press Ctrl-Space a second time to stop capturing data. The data is now on the system clipboard.
- Change desktop PC focus to the preferred editor or text speaking tool.
- Paste the clipboard contents to the preferred editor.
- Navigate through the pasted data and let the editor’s speech interface render the data.
Extracting Features and Rendering via Text-to-Speech
In this method rising and falling level transitions, such as seen when opening or closing a digital switch, are detected. If the NVDA screen reader application is running at the same time as the IDE, the transition is read by the screen reader, as “high” or “low”. The workflow is:
- Open the Arduino IDE serial plotter.
- Perform the desired physical input on the embedded system.
- Signal transitions from low to high are spoken as “high”, and signal transitions from high to low are spoken as “low”.
This method presumes that the user has successfully configured their Arduino IDE and the Java Access Bridge to send accessibility events to the installed screen reader.
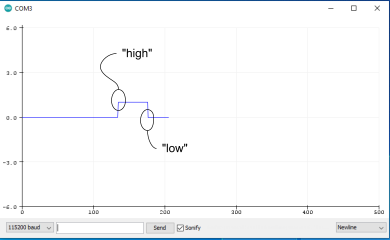
Example of plotted signal with high and low transition features detected.
Continuous Tone with Variable Pitch
In this method, a continuous tone is played while receiving the signal. As the signal value rises and falls, the tone pitch also rises and falls. The workflow is:
- Open the Arduino IDE serial plotter.
- Check the ‘Sonify’ check box. Note that a tone is played.
- Perform the desired input operation on the embedded system.
- The pitch will change to a high frequency when the signal level is high, and return to low when the signal is low.
- Check the Sonify check box again to silence the tone.
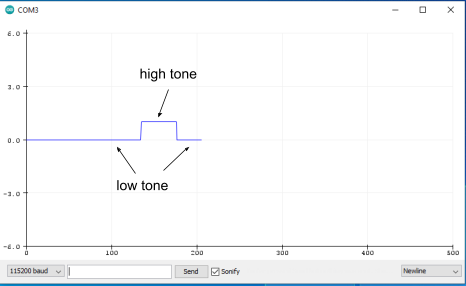
Example of plotted signal showing where high and low tones are played
The continuous tone generator implemented for this project has a defect in that the sound played back has occasional pops. We believe this is due to simple direct signal synthesis technique used for tone generation. Given time, it should be possible to either fix this defect or find an alternative tone generation technique which does not exhibit this problem.
Validation
Validation consisted of self-testing our work. We wrote several Arduino sketches which generated different kinds of digital signal streams:
- Multiple simultaneous channels of data.
- Square wave of fixed frequency.
- Sporadic button presses.
and used these as tests while designing and developing our solutions.
We did not have time or resources to put our work in front of blind or low vision users who might be able to give usability feedback on the tool. Embedded system debugging is a highly individualistic and manual task. The real-world usability and value of our work still needs to be validated through a carefully run user study.
Learnings and Future Work
We have learned that it is possible to modify the Arduino IDE’s signal analysis tools to add easy data export and sound output. These modifications make it possible to discern changes in embedded device signal level without relying on the visually-oriented features of the Arduino IDE.
As previously mentioned, the most important next step is to get real-world feedback from users about the usability of the features within a personal embedded debugging workflow. At best this will validate our approach; if issues are found they will help guide future improvements.
Aside from conducting user validation and responding to any significant issues found, other work which could be done in this area includes:
- Improve audio quality of the continuous sonification tone.
- Explore more complex signal feature extraction; for example, sequences of pulses matching a particular pattern.
- Extend these features to other signal rendering environments such as Visual Studio Code or standalone open source signal plotting tools.
- Conduct user research on current day BLV user embedded system debugging practices to learn more about preferred operating environments (i.e. Windows vs Linux vs Mac) and preferred screen readers.
- Connect with other Arduino IDE developers working on accessibility features to learn how we can work with them to improve things.
References
“Arduino IDE Downloads”, https://www.arduino.cc/en/software, accessed 6 June 2021.
“Arduino IDE Setup with Windows Screen Reader.” (2016) Blind Electronics blog http://www.blindelectronics.com/2016/08/arduino-ide-setup-with-windows-screen_22.html accessed 6 June 2021.
“Arduino 1.8.10 has been released with improved accessibility,” (2019) https://blog.arduino.cc/2019/09/16/arduino-1-8-10-has-been-released-with-improved-accessibility/, accessed 8 June 2021.
“Java SE Desktop Accessibility,” https://www.oracle.com/java/technologies/javase/javase-tech-access-bridge.html, accessed 6 June 2021.
“Sonification and Simple Auditory Displays with Arduino,” (2018). Blind Arduino Blog http://blarbl.blogspot.com/2018/11/sonification-and-simple-auditory.html; accessed 6 June 2021.
Qutieshat, A., Aouididi, R., and R. Arfaoui. (2019). “Design and Construction of a Low-Cost Arduino-Based pH Sensor for the Visually Impaired using Universal pH Paper”, J Chem. Educ. 2019, 05, 2333-2338 (website: https://pubs.acs.org/doi/pdf/10.1021/acs.jchemed.9b00450; accessed 6 June 2021).